Submitted by LibRaw on
Some say, "exactly like dragging exposure slider in Lightroom, ISO ... is just digital gain".
With a few exceptions (for example, older Sigma cameras, older medium format digital backs, where ISO setting does really nothing to raw data, nothing at all), this is less than a half-truth.
Though it is often the case that at higher ISO settings digital "gain" is applied (or a converter, using a metadata tag, is instructed to apply it), analog gain still acts first, before "digital gain" (the better word for what happens in digital domain would be "multiplication", not gain, as in electronics "gain" most often pertains to analog domain).
The giveaway for multiplication used as an "ISO speed helper" is deep and regular gaps in the histogram that become wider with each increase of ISO setting. Of course in the case of raw data, we need to look at the raw histogram, with a bin size of 1, to see the effect - not at a regular histogram in a raw converter. A tool that you can use for a detailed examination of raw histogram is RawDigger.
For many current cameras, you also can download raw samples at a range of ISO settings from DPReview Studio shot comparison page (we used Daylight Simulation mode, the default one).
The following illustrates how one can determine if digital "gain" (multiplication) is present to aid ISO speed implementation.
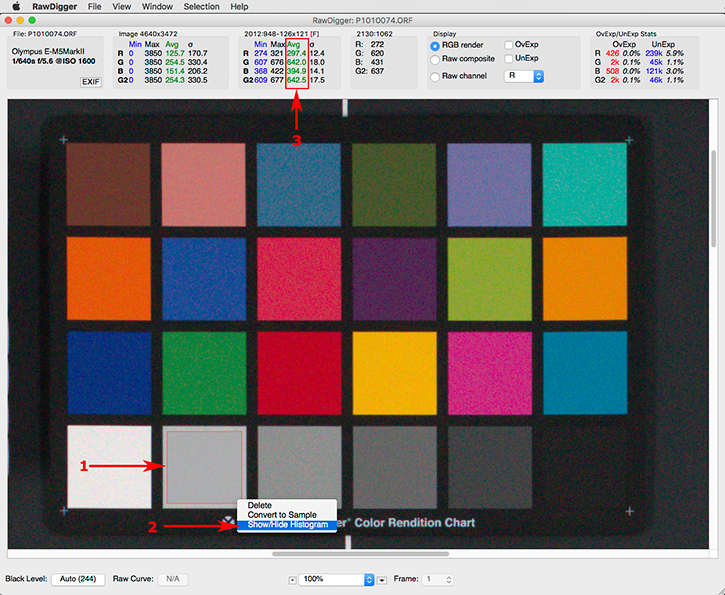
Open the first of the downloaded shots in RawDigger. Zoom-in. Make a selection (press Shift, click and drag to mark the selected area) over a neutral patch on the Macbeth ColorChecker that is not too dark (we used second from the left - #1 on the picture below). Allow for some space between the patch borders and the selection. Right-click on the selection, and select "Show Histogram" (#2 on the picture below).
Picture 1. Olympus OM5 Mark II. A shot with ISO 1600. Selection on the patch B4.
Red rectangle at the top (#3) marks per channel average values, which we will need at the next step.
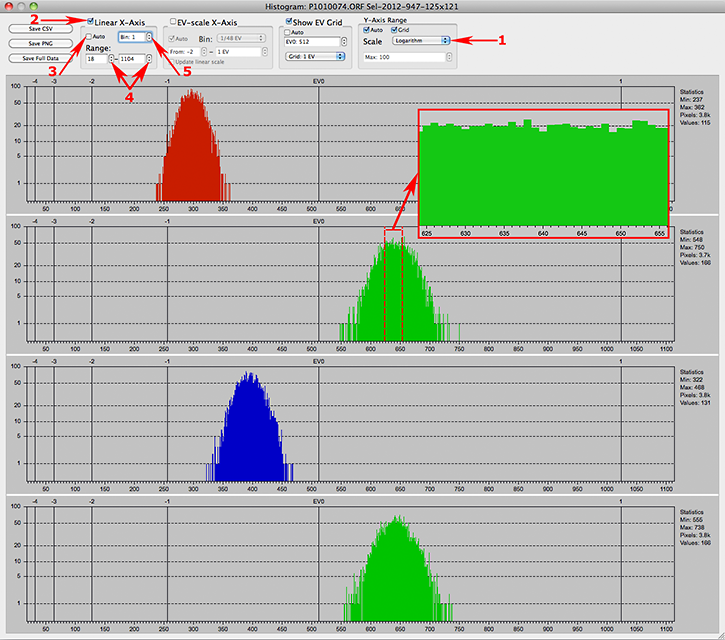
The raw histogram will be displayed in the separate window. Now, we need to configure the Histogram window.
Picture 2. Olympus OM5 Mark II. Raw Histogram for a shot with ISO 1600 - no multiplication
Here is how we did it:
- Y-axis Range section, "Scale" drop-down: chosen "Logarithm", to see low numbers of pixels for the given level / bin clearly;
- Linear X-Axis: checked;
Here are the settings we used for close examination of the areas between two red dashed lines (crops from those areas are shown on the insets):
- In the main window take the average value in the first green channel (picture 1., per channel average values marked with red rectangles at the top - number 3), - in our case, it is 642;
- In the Histogram window, in Linear X-Axis section:
- uncheck "Auto";
- in "Range":
- set the minimum (left field) to something like the average (from the main window) minus 40 (we set to 600);
- set the maximum (right field) to around average plus 40 (we set to 680)
- decrease "Bin": set to 1 (if it isn't already at 1).
After loading the first file and examining the histogram, you can continue loading shots taken at other ISO settings (say, by dropping them onto the RawDigger icon). The selection will stay in place - no need to repeat the selection procedure.
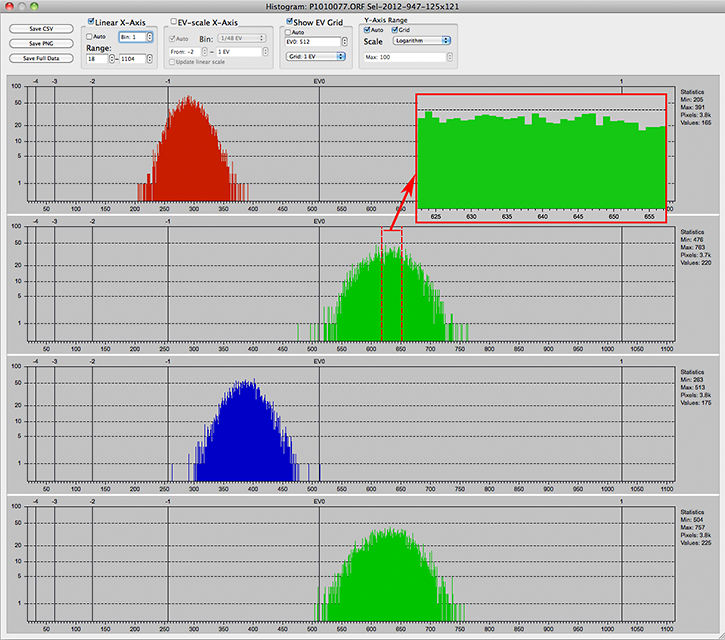
Picture 3. Olympus OM5 Mark II. Raw Histogram for a shot with ISO 3200 - no multiplication yet.
The first two screenshots, ISO 1600 and ISO 3200, demonstrate how a raw data histogram looks when no digital "gain" (multiplication) is involved, no deep regular gaps are present.
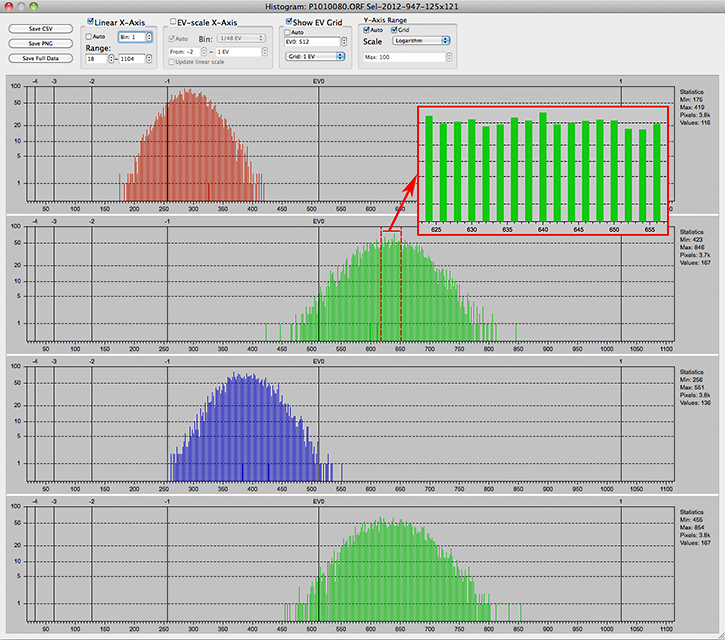
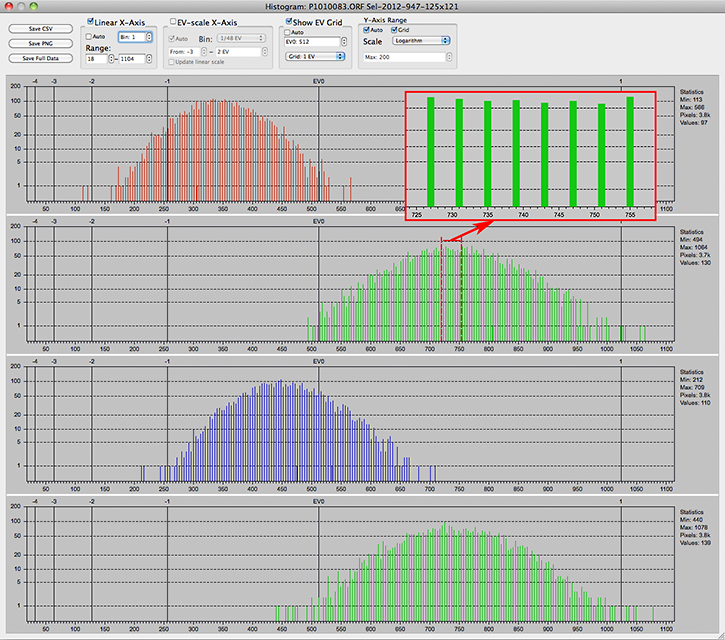
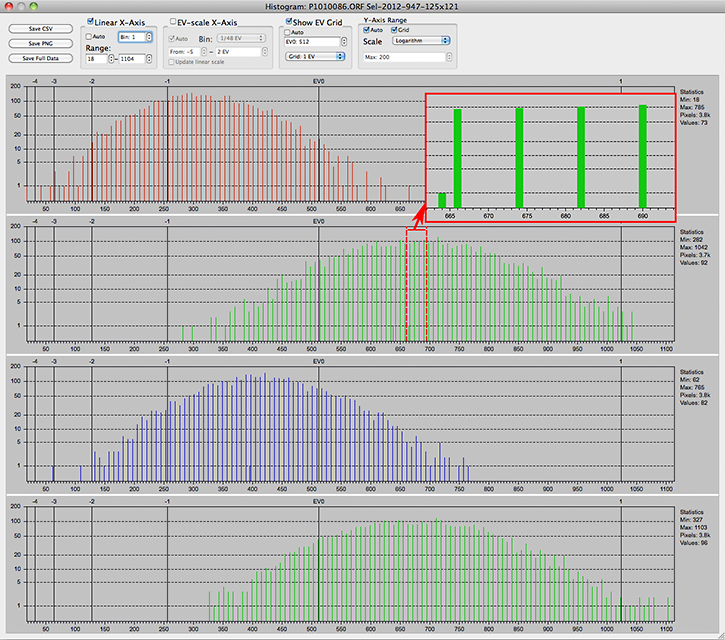
The next three screenshots show regular gaps in the histogram appearing when the ISO setting is further increased, starting from 6400. Those gaps are due to multiplication acting on top of analog gain.
Multiplication by 2 results, as you can clearly see on the inset, in even-only values in raw data - each second level is missing in the histogram...
Picture 4. Olympus OM5 Mark II. Raw Histogram for a shot with ISO 6400.
.. with multiplication by 4 only 1 level out of three is present, 3 are missing,...
Picture 5. Olympus OM5 Mark II. Raw Histogram for a shot with ISO 12800.
...and so on.
Picture 6. Olympus OM5 Mark II. Raw Histogram for a shot with ISO 25600.
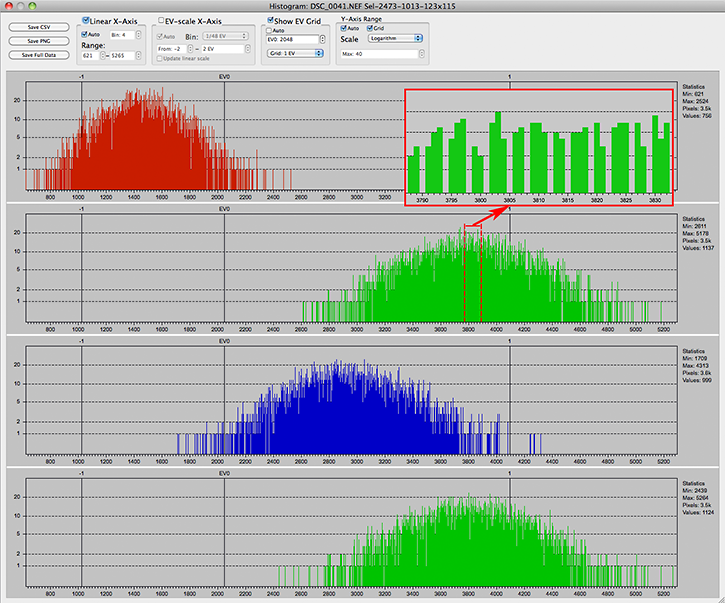
In some cases the multiplication factor can be fractional (because the last ISO setting without a digital boost applied to raw data is ISO 10,000, and thus for ISO 12,800 a boost of approximately 1/3 EV, 12800/10000 = 1.28, is needed); and in this case you will see something like this:
Picture 7. Nikon D7500. Raw Histogram for a shot with ISO 12800.
Some other cases which lead to gaps in histograms
The gaps in raw data histograms are mostly the result of applying, in the digital domain, corrections and calibrations to raw data. They may also result from lossy compression of raw data. In some of these cases the gaps are regular, but in some cases they seem not to be; for example, when the multiplication factor is a product of two or more factors and at least one of them is a fraction. In some cases the gaps don't reach the X-axis (zero pixel counts), as a result of inevitable rounding errors when doing integer calculations with fractions, and/or adding some noise intentionally to dither the raw data in an effort to avoid posterization.
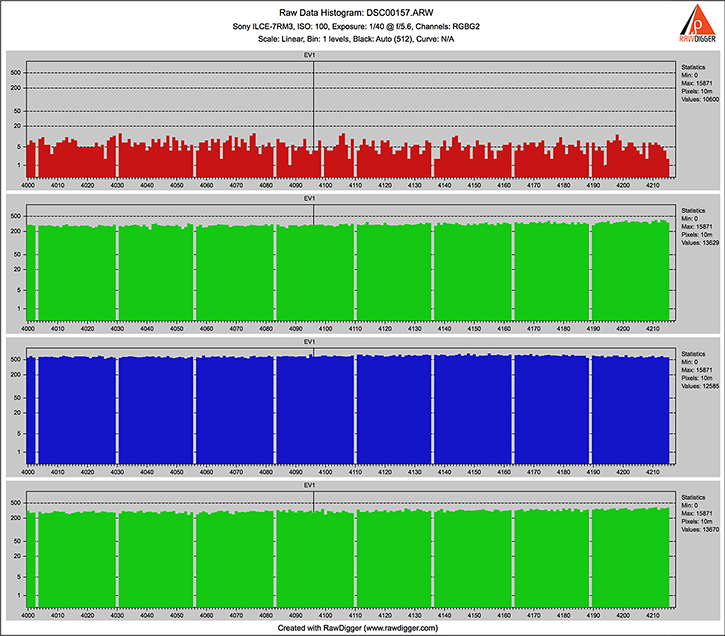
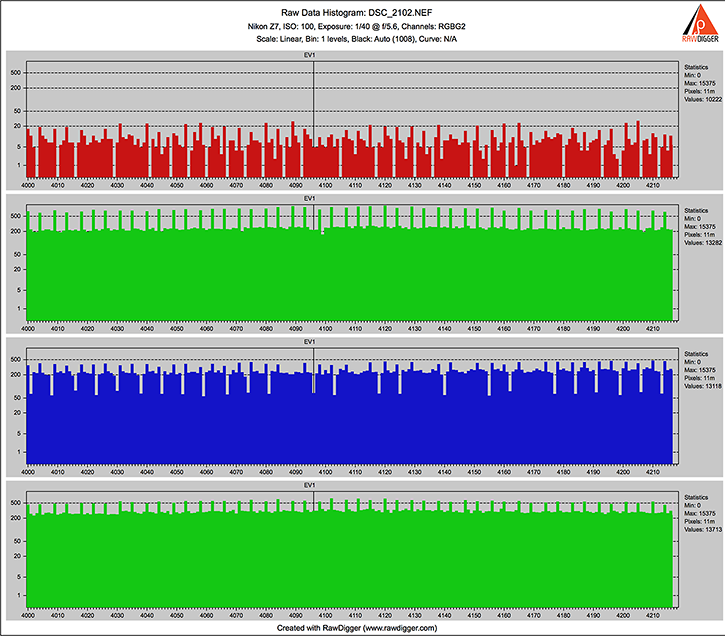
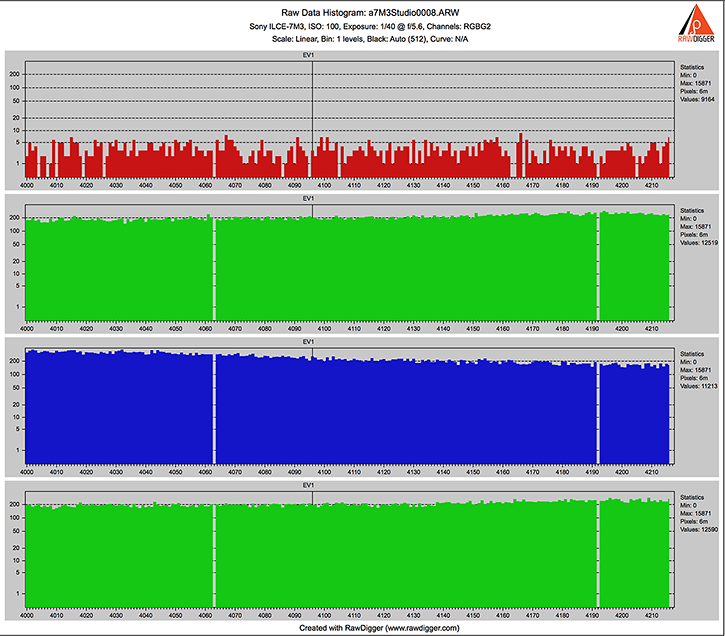
Up till now, we've discussed only one such correction, that is digitally boosting raw data numbers for a higher range of ISO settings; those are relatively large boosts. Another common case is applying small adjustments to the output raw data in order to compensate for sample-to-sample sensor variations and other factors, like sensor heating. This can be done for all of the channels using the same small factor, and resulting in the regular scarce gaps that are also present at low ISO settings, like you see below, taken at ISO 100. This is the case when multiplication is applied for the purpose of ISO calibration, not for any major boosting discussed previously:
Picture 8. Sony ILCE-7RM3. Raw Histogram for a shot with ISO 100.
That was an example with a Sony camera; Nikon's approach is different. They used to call this type of calibration "white balance pre-conditioning", and what it is is color channel calibration, implemented as an application of small correction factors to (most often) only the red and blue channels - hence there are gaps in those channels. The goal of such calibration is to use a single color transform (profile) for all the cameras of a given model, without the help of an additional color calibration transform in a raw converter (Canon cameras, as well as some other makes/models, are designed to use such an additional transform, no harm in that too). Due to relatively small blue calibration factor this particular camera sample needs, as well as due to to other corrections being in play (flat field correction, for example) and also because of rounding error, the gaps in the blue channel don't reach the bottom (one can refer to such gaps as to pits). From the location of the gaps one can see that they are not aligned, as they were with Sony, and that's because the correction factors are different for red and blue.
Picture 9. Nikon Z7. Raw Histogram for a shot with ISO 100.
Here is an example (again, with a Sony camera) where corrections for additional factors are responsible for irregular gaps in the red channel, some aligned with the other three channels, and some not.
Picture 10. Sony ILCE-7M3. Raw Histogram for a shot with ISO 100.
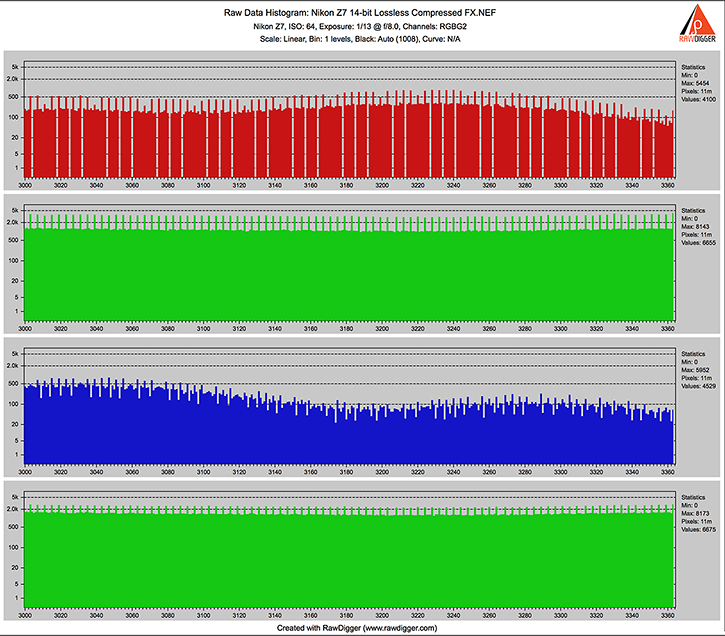
Last but not least, here is an example of gaps caused by lossy compression. First, a shot with lossless compression, no gaps apart from those caused by "white balance pre-conditioning":
Picture 11. Nikon Z7. Raw Histogram for a 14-bit lossless compressed shot.
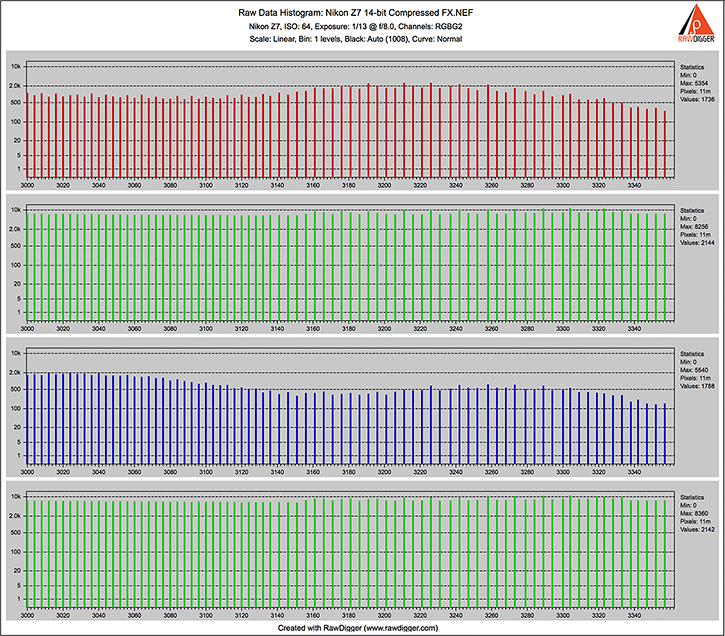
Now, a shot with the same exposure, but the camera is set to lossy compression:
Picture 12. Nikon Z7. Raw Histogram for a 14-bit shot with lossy compression.
As we can see, lossy compression results in skipping raw data numbers, mostly where it is inconsequential because of relatively strong photon shot noise (lighter tones of the image). The width of the gaps left by lossy compression varies depending on the tone; such gaps can be absent in the shadows, and the start to appear and get wider with the progression of tone towards highlights. To explore this gap progression in RawDigger you can use File -> Dump RAW Curve feature and plot the resulting .csv file using a spreadsheet application.
Note: the compression curve is applied before black level subtraction. If black level subtraction is on, the curve and the histogram are not aligned. To make the comparison of the curve with histogram simpler, you can switch off black level subtraction in RawDigger.
How to distinguish gaps resulting from digitally boosting raw data to help analog voltage gain at higher ISO settings from gaps caused by other mechanisms (adjustments, calibrations, digital correction for lens vignetting and T-stop, for changes of sensor responsivity due to the extreme angle of incidence, various other types of flat field and pixel response non-uniformity corrections, lossy compression, etc), if those are also applied in digital domain? - that's easy, the gaps arising from the former become wider when one continues to raise the ISO setting.
Here is another important note: current standard, ISO 12232:2019 titled "Photography — Digital still cameras — Determination of exposure index, ISO speed ratings, standard output sensitivity, and recommended exposure index" contains the following:
ISO speed and ISO speed latitude values shall not be reported for raw images, however, because with raw images processing that affects the values has not been performed.
Thus, according to the standard that is developed by a workgroup that includes representatives of major camera manufacturers, the "ISO speed" parameter is not defined for raw at all.
To know more about your camera and raw data it creates, you can use RawDigger. It is fully functional in a 30-day trial mode. With the help of RawDigger, you can check most extraordinary claims about raw.

2 Comments
Usage of ISO settings and EV value result in RawDigger
Submitted by Wilhelm (not verified) on
Hello.
For investigation of the ISO settings in my Sony Alpha 99M2 I made the following test shots:
1) Normal exposure with ISO 100 and f2.8 1/10 s --> leads to EV3 in RawDigger
2) Underexposure with ISO 100 and f2.8 1/80 s --> leads to EV0 in RawDigger
3) Shot with ISO 800 in camera mode A gives also f2.8 1/80 s --> leads to EV3 in RawDigger
The question of what I'm interested in is, what the sensor has seen before analog/digital gain and or multiplication. I assume it must have been the same as with exposure no. 2 (underexposure with EV0). Am I right with this assumption?
Wilhelm
Of course you are right, if
Submitted by LibRaw on
Of course you are right, if the scene is the same and the light is the same - because exposure is the same, the initial pixel response is the same.
Add new comment